
In a number of past tips I’ve said that most adults seem to have stiff hips and thoracic spines (mid-backs), with the latter also often leading to stiff shoulders. And I’ve offered a number of mobility drills and stretches that can help, including:
- Tea cup (shoulders & spine)
- Brettzel (spine & hips)
- T-spine bridge (shoulders, spine, & hips)
- Hip stretch (hips & thighs/quads)
- Tactical frog (hips & groin)
- Cossacks (hips, hamstrings, & groin)
While all of those drills are great, none of them involve using external resistance. That’s not a problem, per se, and could actually be considered a benefit since the drills can be practiced anywhere.
However, weight can not only be instructive when stretching but is also necessary for strengthening muscles through their newfound range of motion. When muscles are strong throughout their entire normal range of motion, related joints are less likely to develop stiffness as a safety mechanism to compensate for instability. So performing stretches or mobility drills safely with added weight can both prevent some stiffness in the first place and promote faster progress when working toward improving mobility.
On that note, today I’m going to cover a drill that uses external resistance to improve spine and shoulder mobility and shoulder stability. It’s a drill that I personally hated after first learning, mostly because my shoulders and spine were stiff and inflexible and the drill was difficult. But after a lot of practice and improvement, it’s now one of my favorite movements to do with a kettlebell and is a staple warm-up before I put anything overhead.
It’s the kettlebell arm bar.
Kettlebell Arm Bar: load, lock, and roll
To set up for the arm bar, lie on your back next to a light kettlebell. (You can also use a dumbbell or other type of weight, although a kettlebell does enhance the movement because of the position of the weight in relation to your arm and shoulder.)
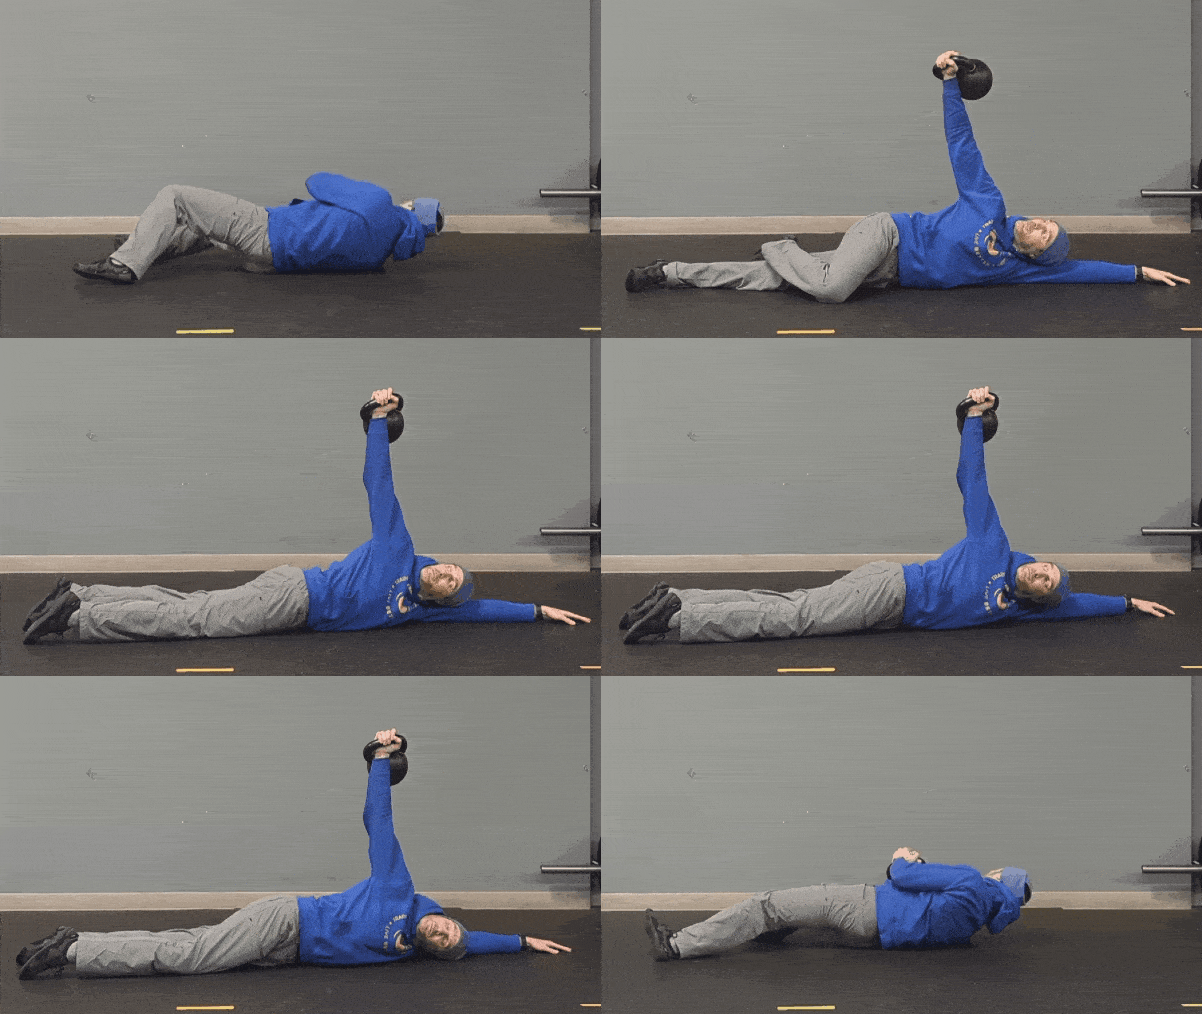
Grab the kettlebell in one hand, and press it toward the ceiling like a bench press until your elbow locks. For safety, make sure to keep it locked throughout the rest of the movement! The same-side leg should be bent, and the other hand should be placed overhead to form a straight line with your torso and other leg.
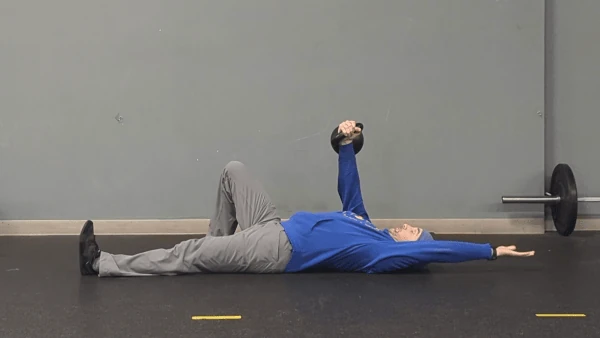
Push the heel of the same-side leg into the ground in order to roll onto your side, and let the same-side knee come to rest on the ground in front of you.
At this point, your non-working arm should be palm-down, still in line with the torso and other leg. Rest your head on your arm while continuing to look toward the kettlebell. That will go a long way in helping to maintain balance and keep your shoulder safe.
While the hand that’s holding the bell should be closed, the palm should face in roughly the same direction as your chest. Optionally, you can choose to rotate the shoulder of the working arm to challenge both your balance and shoulder stability.
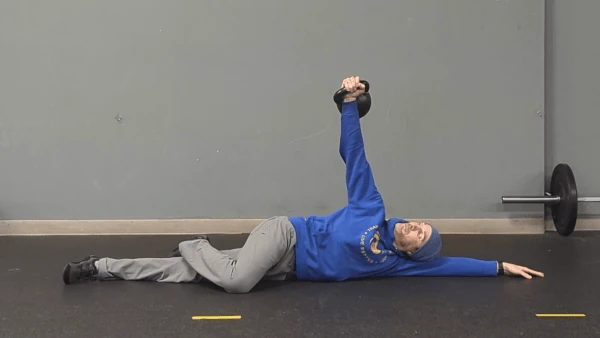
If you’re somewhat uncomfortable or unstable, this is as far as you need to go for now. After a few seconds, you can roll back onto your back while using the same-side foot as a “kickstand” so as to not “flop”, and then safely set down the kettlebell.
Alternatively if you’re stable and want to progress farther, the next step is to bring the foot on the working side all the way to the ground next to the other foot and press your hips into the ground. Make sure to keep the head resting on the biceps of the non-working arm while continuing to watch the kettlebell throughout the movement.
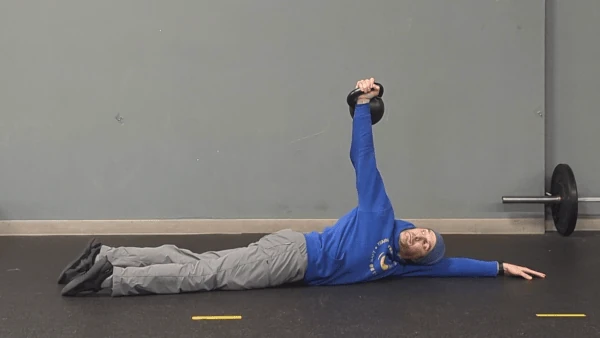
As a final step if you’re feeling both mobile and stable, walk the non-working hand backward until you can rest your head on the floor instead of the biceps.
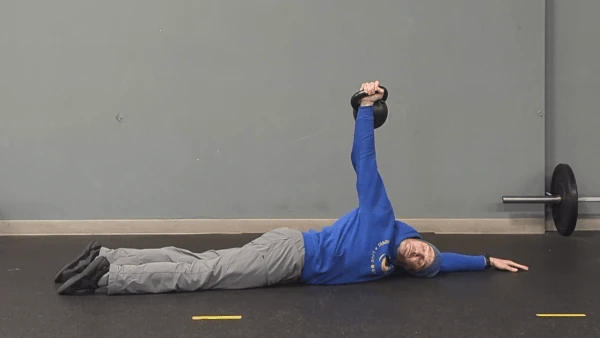
Whatever step you reach, remember to lead with the foot on the working side whenever you decide to roll back to the starting position. And, of course, switch hands and repeat on the other side.
Putting it all together will look like this:
Putting it into practice
Try the kettlebell arm bar as part of your warm-ups prior to your next upper body (or back squat) session or as part of your normal mobility practice. Whatever step is your end range, hang out in the position for 15-30 seconds or 3-5 breaths to start.
Eventually you might consider working up to a minute or longer, using a heavier kettlebell, closing your eyes at various parts of the movement, or any combination.
In any case, I have no doubt that consistent practice will produce noticeable improvements to your shoulder mobility, stability, and strength.