
At some point in your life, you’ve probably heard (or uttered) the admonition, “Lift with your legs, not with your back!”
And it’s true: we should lift objects using our legs instead of our back. But like most advice that’s become cliché, the reasoning is accurate while the application often is not.
Reasoning
Loading the body—that is, picking up weight of any kind—while moving the spine from flexion to extension, or vice versa, is an invitation to injury. This is at least partly due to excessive forces being placed on compressed portions of the discs (the “spongy stuff” between the vertebrae, or bones of the spine).
Healthy spines should be able to bend forward, backward, and side-to-side as well as twist, but those movements are best performed unloaded. In other words, experiencing spine flexion while bending over to tie your shoe or moving in any of a number of directions when stretching or practicing yoga is totally fine. But doing so while picking up a child, bag of groceries, or barbell is not.
Application
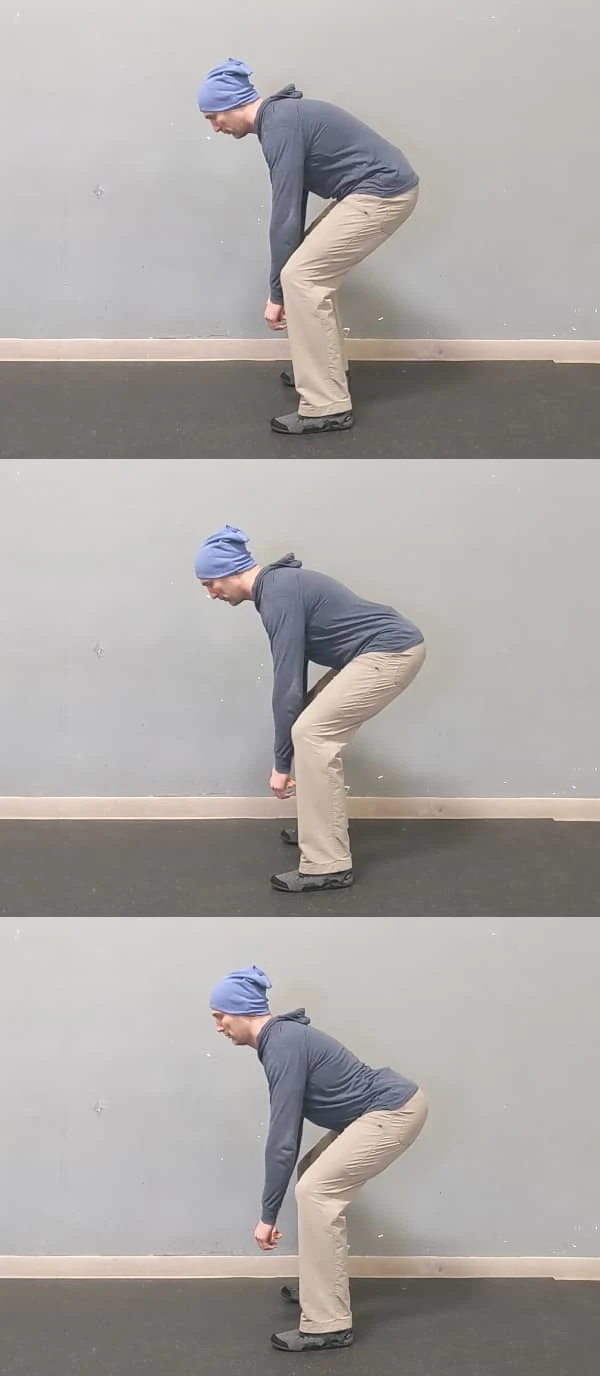
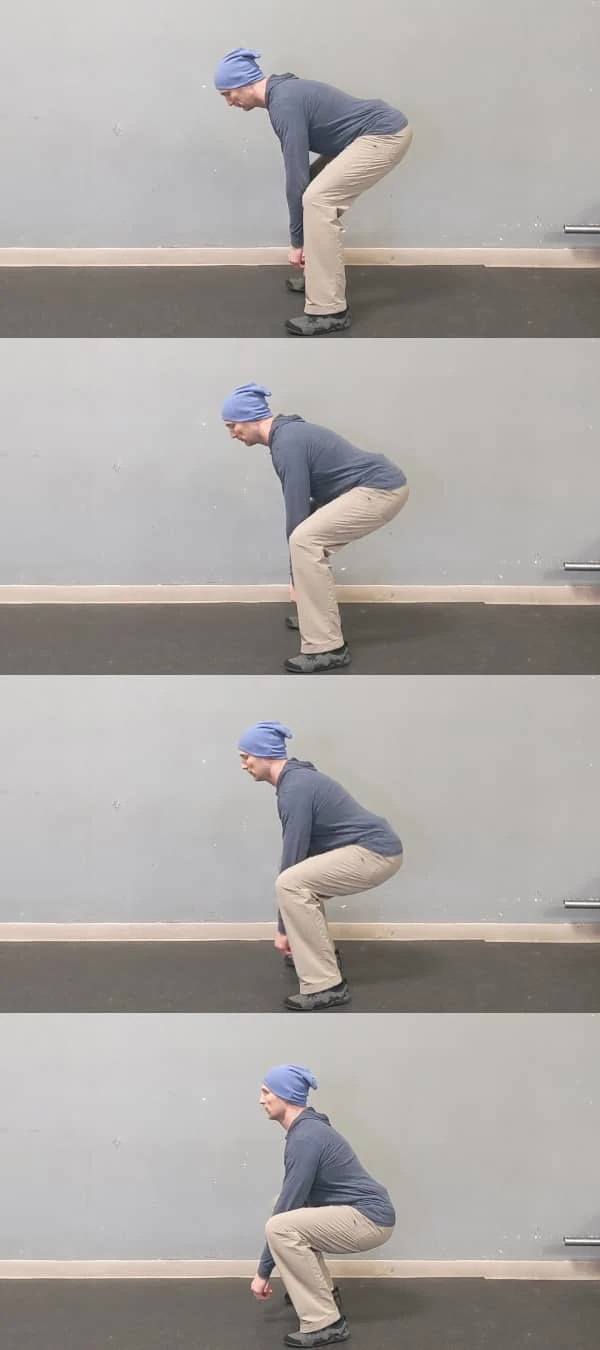
Unfortunately, this advice is typically interpreted as “squatting is good and hinging is bad”. To many people, squatting looks more like a leg movement than hinging does because of the greater range of motion used by the hips and knees. And in everyday movements we often flex our spines when we hinge, so the two terms (and movements) are regularly misinterpreted to be the same.
But hinging is as much of a leg movement as squats, and the spine can move into flexion or extension while doing either. Of course, the spine can also maintain a neutral position in each of those movements too. And when it comes to lifting weight from the ground, hinging is actually more mechanically efficient.
Drills
A somewhat famous line from a specific veteran of the fitness industry states, “Squats don’t hurt your knees; the way you squat hurts your knees.”
A similar statement can be made for hinging: Hinges don’t hurt your back; the way you hinge hurts your back.
Here are two simple drills you can practice to learn to hinge well so that you can both “lift with your legs” and not hurt your back.
Pinch hinge
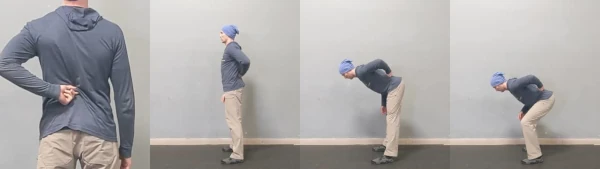
- Pinch the skin of your lower back between your index finger and thumb. This will help you notice when you round (flex) your spine because doing so will cause the skin to slip out of your pinch grip.
- While keeping your knees locked, bend forward at the hips as far as you are able while keeping the skin pinched. Start over at step 1 if you lose the grip, and don’t bend quite as far.
- When you’ve bent as far as possible without losing the pinched skin, bend your knees slightly. This is the bottom of a good hinge position for your body.
- Stand up straight.
- Now try to move back to the bottom position while simultaneously bending your knees and hips. Again, practice steps 1–4 if the skin slips from your pinched fingers.
Hinge-to-squat
Now that you’ve found your “hinge position”, review the image compilation in the Application section above, and do the following:
- Get into your hinge position (without pinching the skin of your back between your fingers).
- Notice how your abs and back feel. Do not lose that feeling while you move through the following steps. If you do, practice the Pinch Hinge awhile longer.
- Slowly bend your knees and let your hips drop toward the floor.
- Pause when you feel that you can’t move any deeper into the squat, and begin straightening your knees and raising your hips. (Do not completely straighten your knees. Rather, stop when you reach your hinge position from step 1.)
- Repeat the movement a few times to understand the differences and similarities between the hinge and squat.
Putting it into practice
Whatever your experience, fine-tuning and practicing your hinge with slow, unweighted movement will improve your ability to lift heavy objects both inside and outside the gym.
So, try each of the drills above a couple of times this week. Then pick up a light kettlebell, barbell, or backpack with the same technique.
It should feel the same weighted as unweighted. If it doesn’t, go back to more unweighted practice.
If it does (particularly if you have past experience), continue increasing the weight, speed of movement, or both until just before the movement feels different or you reach your current training weight. That’s the weight or speed where you should spend time practicing and training.