Knees and shoulders seem to be the two joints that most often cause people distress.
Sharp, severe, or constant pain can be a sign that structural issues might exist (e.g. tears, bone spurs), in which case seeking advice and assistance from a medical practitioner is the best first step toward resolution.
On the other hand, infrequent, dull, or movement-induced discomfort doesn’t guarantee you’re in the clear. However, it often indicates that less severe causes are to blame. In those cases, exercises that improve mobility and strength can significantly reduce or eliminate the discomfort and are often recommended prior to more invasive solutions (e.g. cortisone shots, surgery).
You might find this shoulder tip (with links to other related tips) helpful if your shoulders fall into the latter category. But if your knees are the more bothersome joint, check out the following simple movements for potential relief.
Figure-4 with ankle rotation
It might seem strange to try to resolve knee discomfort by focusing on a different joint, but that’s actually what we’re going to do with the first three (mobility) drills below. The primary reason is that the body is highly interconnected.
Though it seems logical that the spot of the pain would also be the location of the problem, that isn’t necessarily the case with joints that don’t have structural issues. Rather, the joint in question could be experiencing discomfort because it’s compensating for a restriction either above or below. In the case of the knee, that means addressing the ankles and hips.
As I’ve mentioned in plenty of past tips, modern humans do a lot of sitting. That excessive lack of movement does a number on our ankle and hip mobility. Improving mobility in those joints can have a profoundly positive effect on our knees: reducing discomfort if we have it, and improving our structure, function, and strength even if we don’t.
To do this drill, sit on the floor with your legs extended. If your hips are tight and sitting upright on the floor in the middle of the room is challenging, you can do one of three things: sit with your back against a wall, elevate your hips by sitting on a step or short box, or stretch your hips before doing this drill. (We’ll cover that in more detail in a minute…)
Bend one knee, crossing the ankle over the other leg so that your legs look like a figure-4 (what a surprise, right?!? 😉). Then, using your hand, rotate your foot for 8–10 reps both clockwise and counterclockwise.
And, of course, make sure to repeat on the other side.

Two variations of Seiza
“Seiza” is the formal, traditional way of sitting in Japan. It’s also a convenient way to stretch the ankles and toes. Simply get into a kneeling position, either with your toes pointed or curled, and sit back onto your ankles. Hang out for a few minutes, and then switch to the opposite toe position for a few more minutes.
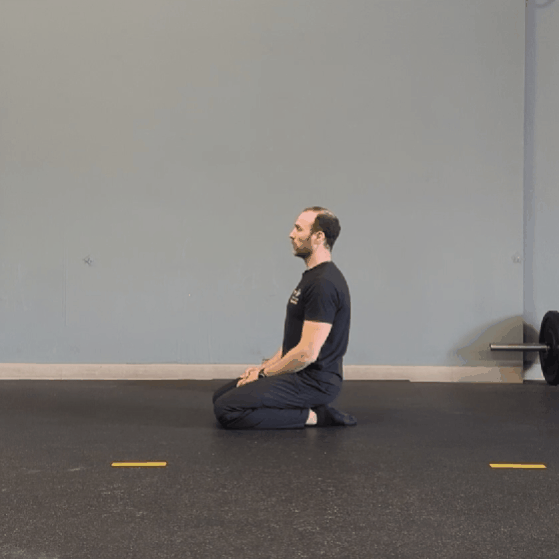
Again, you have options if you find that your toes, ankles, or knees are very inflexible when you first try this drill.
If your knees hurt when at full flexion, you can place a pillow (or two… or three) between your ankles and butt so as to reduce the degree of flexion that your knees experience. Similarly, a rolled up towel or small-diameter foam roller can be placed under your ankles in the toes-pointed position if fully straightening your ankles (plantar flexion) is uncomfortable.
Alternatively and in the case of inflexible toes in the toes-curled position (neutral ankle position or dorsiflexion), supporting yourself with your hands on a step, chair, or short box or stack of books is your best option.
Quadriceps and hip stretch
If you’ve been reading these tips for awhile, you may recall reading about this hip stretch.
In the interest of time, I won’t rehash all the details here. But spend a few minutes reviewing that tip if you need a refresher, are new to these tips, or especially if you struggled with sitting on the floor during the figure-4 drill.
And remember to pay special attention to the subtleties. This is a drill that is often overlooked or performed incorrectly. Which isn’t necessarily dangerous, but definitely less effective!
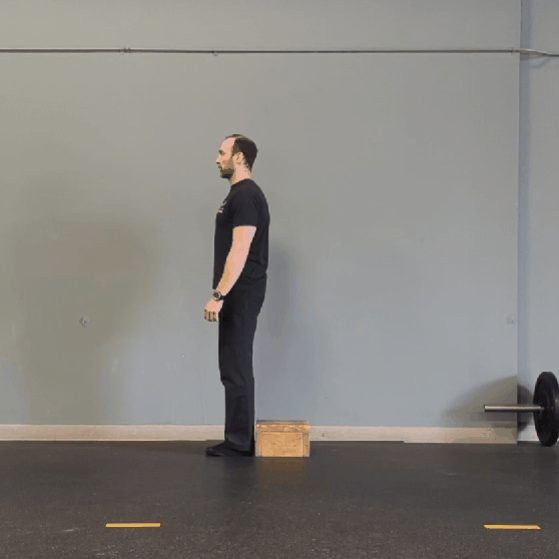
Reverse step-ups
Now that you have at least slightly better mobility in your ankles and hips, you’re ready for a strengthening exercise for the muscles around the knee: reverse step-ups.
Like the hip stretch linked above, this exercise looks (and is) simple. Just step backwards onto a short box or step.
But also like the hip stretch, a very important subtlety determines the benefit you’ll get (or not) from the exercise. After you place your foot on the box, shift your hips backward before using the leg with the foot on box to step up.
Do not push with the leg that has the foot on the floor. Doing so would be easier, but it also defeats the purpose.
When you first add this exercise to your routine, a couple sets of 5–8 reps will be plenty, especially if your knees are currently a bit achy. As they become stronger, bump the reps up into the 10–20 range and/or add weight by holding a dumbbell or kettlebell in your hands.
Putting it into practice
The exercises above may not seem flashy. But often the simplest solutions are the most effective, when implemented consistently.
So if your knees are more achy than you’d prefer or think they should be, spend 5–10 minutes every day or two practicing the routine above. And consider performing the hip stretch first if you struggle with sitting in the figure-4.
Specifically if you struggle with any of the three mobility exercises, I wouldn’t be surprised if modest improvements with any of them resulted in better-than-expected improvements to both your knee health and, after a brief adaptation period, your lower body strength.